Creating and publishing your first Request Offering
Our Service Manager server is now setup and ready to rock. We now need to develop some actual services your users can request or submit within your portal. This is one of Service Manager’s core functions, to provide services to your end users.
The needs for Service Manager can vary from business to business and you can sometimes find some of the configurations unecessary which you can skip them, but the basics remain the same. For instance, this post is about providing a Hardware Incident offering (service) that users can access or request, but yours could be about iPhone Incidents or other.
Table of Contents
Getting started
In order to follow this post you will need to make sure you’re using an account with the right priviliges to create and publish offerings into your portal. When it comes to end users permissions to access the offerings and to make the access and permissions more granular, I’d advise you to create a Security Group in your Active Directory that can be used to manager your users and offerings accesses.
Before we go any further I’d like to clarify some points that I will cover so you understand their meanings and use cases:
Request Offerings
– Are the services you provide to to your users. From Incident request, Service request to Automation.
Service Offerings
– Are your collections of items (Request Offerings) that your users will see in the portal.
Your Request Offerings are added to Service Offerings so they can be seen and available via the portal. For more information head over to this Microsoft write-up about the topic.
Creating a Request Offering
Once you have defined which service you want to offer to your users, open your Service Manager console, click Library, expand Service Catalog, expand Request Offerings and then click All Request Offerings.
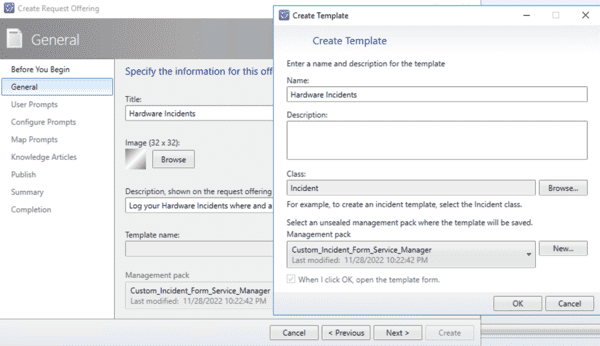
For the purpose of this post I will be creating a “Hardware Incidents” Offering, and it will be an Incident request classification (IR).
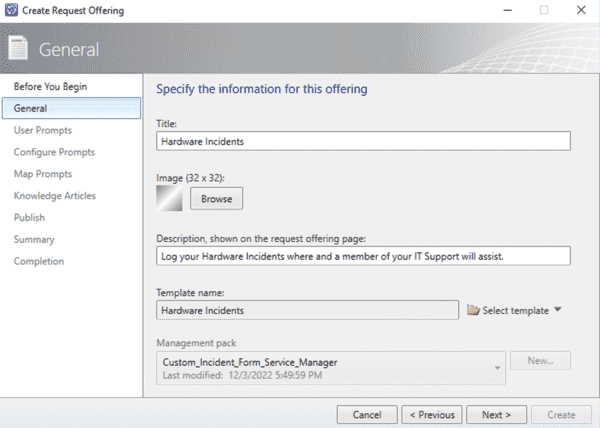
Select All Request Offering, go to the Task pane on the right and click Create Request offering. A new window will open, click Next, give it a Name, select an Image if you like (supported size is 32×32). Add a Description that will help your users understand the service.
Click Select template dropdown and choose Create Template. It’s always good to define Templates and Management Packs for each of your items or anything you need to change. So I’ve created my custom MP, click OK and your new template will open.
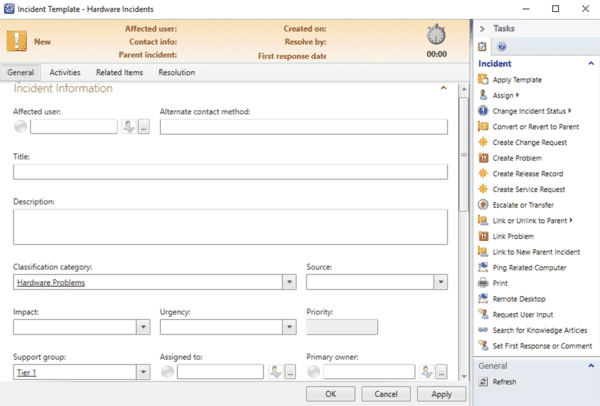
I am not populating so much as users will populate them themseves when filling the form in the portal. Click Apply and then OK to close it once you finish.
Click Select template again, Incident and select your newly created template.
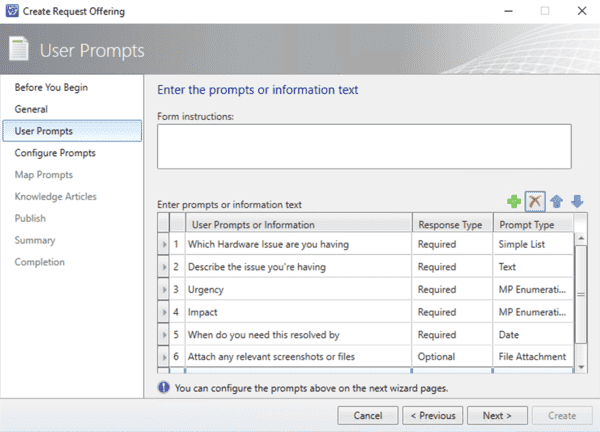
Click Next, now you need to add the information you will be asking your users in the portal. I’ve set Which Hardware Issue Prompt to Simple List as I’ll be adding the option list that users can pick; Describe the issue set to Text so users can free type; Urgency and Impact to MP Enumerating that I’ll use the systems list; When do you need this resolved by to Date picker; Attach any relevant screenshot to File Attachment.
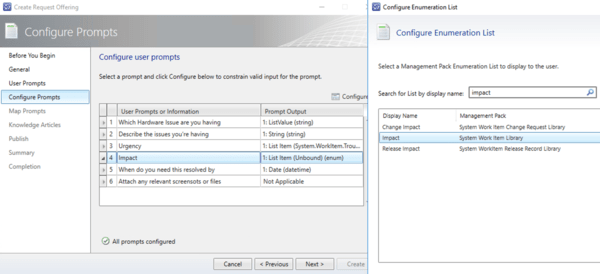
I will now link Impact field created to Impact List, Urgency to Urgency List. These List come out of the box in Service Manager and you can also edit them.
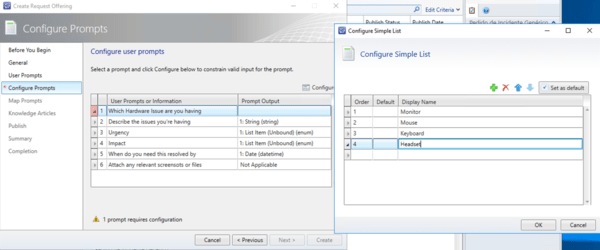
As I will provide some hardware to pick from the list, I’ll select Which Hardware Issue are you having, click Configure and add what you want users to pick. Click Next.
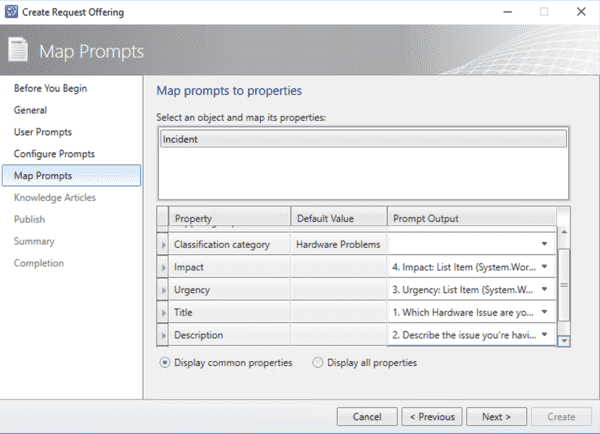
The next step is to link the data your users will enter via the portal to your Template, so the Incident can be created and populated with the data in the right fields. Tick Display all properties to see more, click Next.
You can add Knowledge Articles if you have any that relates to Hwardware, which I don’t have at the moment. Click Next
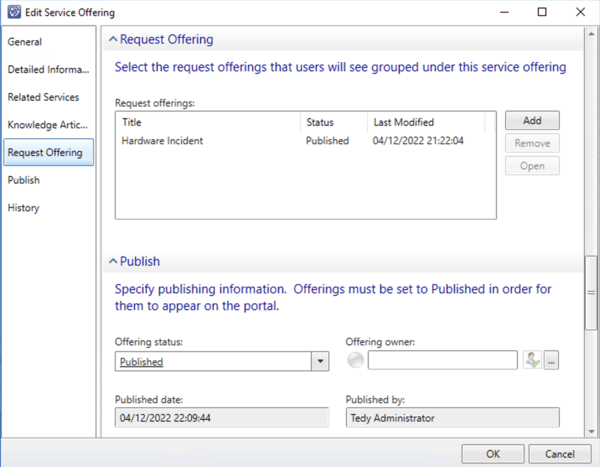
To complete your Request Offering, once you get in Publish tab, click the dropdown arrow and choose Publish. Click finish.
Now you will need to add your Request Offering to a Service Offering. This is so your users can start accessing it in the portal. As i already have one called Hardware Incident, I’ve just added it into it by double clicking my Service Offering, Request Offering, Add and pick your Service Offering we just created. Click OK to save.
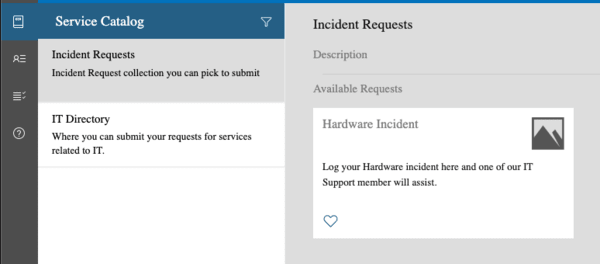
How our End users will see the Request offering “Hardware Incident”.
Once they click it, users can start filling up the incident form as per below. Clicking the heart in the very top will add this Service Offering to their favourite, or the circle to share the link via email.
Final considerations
You’ve now created your first Service Offering, a new Incident template, Management Pack, played with Service Offering setups and how you can tweak Service Manager to provide different services to your end users. There are a lot you can accomplish with this system, and you just need to keep exploring.
This is the end of this post, but do come back for more as I’ll try to post regularly. Until then, have a good day.
0 Comments
Hi,
I did follow you fantastic article and it did work for me. But the End user cannot see o the portal no I created the SO. Only when I login with Admin Account on the Portal, I can see it.
Any Idea why?


Hi,
I did follow you fantastic article and it did work for me. But the End user cannot see o the portal no I created the SO. Only when I login with Admin Account on the Portal, I can see it.
Any Idea why?