How to install Xpenology DSM 7.1 in vSphere (ESXi) 6.x, 7.x or 8.x
This post will guide you through the process of deploy Xpenology 7.1, aka Synology, into your ESXi Server. You can use the same process for ESXi version 6.x, 7.x and 8.x, which all support it.
I should also start stating that Xpenology should NOT be used in a production environment due to its unoficial support by Synology themselves, and for probably infringing their licences.
For who has used Synology DiskStation Manager, DSM, it’s a great software, that paired with a good NAS box, it can achieve wonders. The big problem is that Synology NAS are expensive and their hardware can be sometimes weak and limited when it comes to the CPU provide out of the box, and RAM size limit. We do have to take in consideration that their consumer NAS are targeted to general users, and lower power consumption. With Xpenology you can deploy it as a VM and give it as much resources as you want.
Getting started
With the boring stuff out of the way, let’s start with what is needed to achieve this.
VMware ESXi Server – This is the server that will host the Xpenology Virtual Machine. You can download the latest version. It’s free to download but you will need to register an account.
Xpenology Files – These are the configuration files and the firmware installation. These can be downloaded as a compressed. Just use an unzipper software to uncompress the files such as 7-Zip or WinRar.
Xpenology Virtual Machine setup
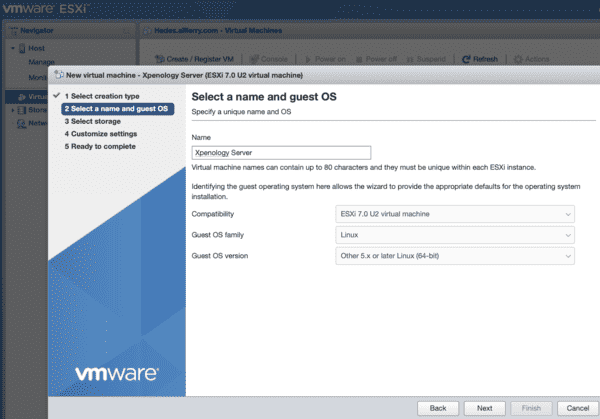
We’ll start with loging into your ESXi Host, right click Virtual Machine on the left pane, choose Create/Register VM. Now choose Create a new virtual machine. Enter the basic information such as your VM name, set Compatability to the version your host supports, mine is ESXi 7.0 U2. Set Guest OS family to Linux, Guest OS version to Other 5.x later Linux (64-bit). Click Next.
Select the storage where your VM will reside. Make sure it has enought space for the storage size you will allocate to your Xpenology VM. Click Next.
You should now be in Customise settings, and its where you will be setting up the main settings for your Xpenology to work properlly. Let’s set some of them now.
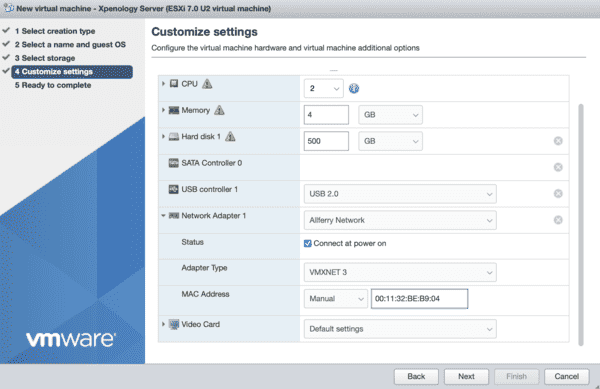
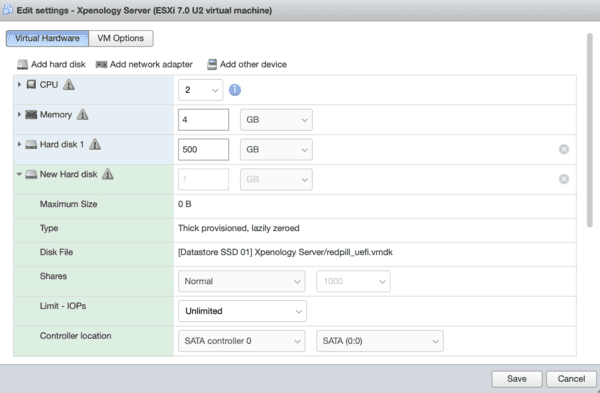
CPU, set it to the amount you want, I’ll give me mine 2 vCPUs. Memory, set your to at least 1GB, mine will be 4GB. Remove CD/DVD Drive as we don’t need it.
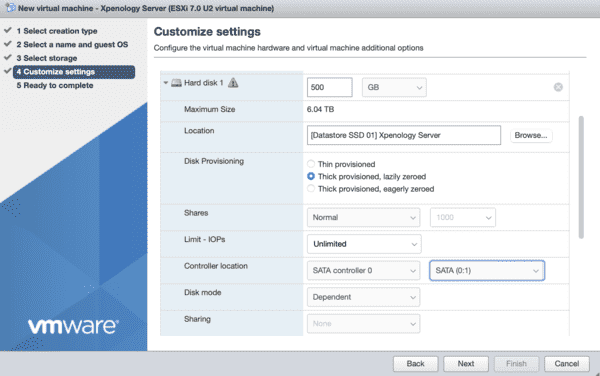
Hard disk set to the amount you want to be used on your Xpenology, I want 500GB, now expand the Hard disk properties by click the arrow on the left of Hard disk, go to Controller location and set it to SATA controller 0 and macth the other box next to it to SATA (0:1) or any number other that 0:0, which will be used by the VMDK disk downloaded ealier. I’ll set mine to 0:1 so i can increase the storage and increment SATA number as per the disk numbers.
SCSI Contoller needs to be removed too as we’ll be using SATA Contoller in the Hard disk controller instead. Note: you can only remove it once you set Hard disk to the comfiguration above mentioned.
Expand Network Adapter and make sure Adapter Type is VMXNET 3, set Mac Address to Manual and enter this mac address: 00:11:32:BE:B9:04. This is very important or you won’t be able to find your Xpenology on your network to complete the setup via your browser.
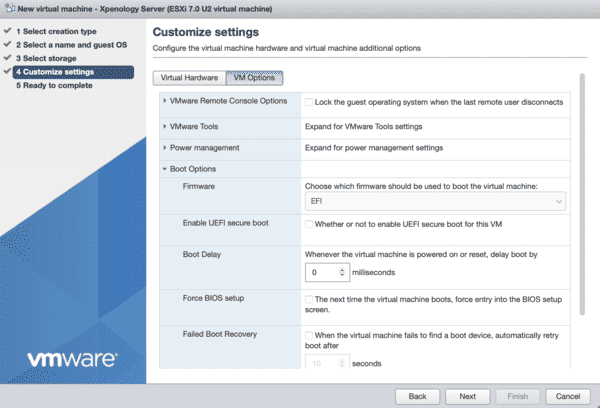
Now go to VM Options tab on the very top, expand Boot Options, make sure Firmware is set to EFI and untick Enable UEFI secure boot.
Click Next and you will be prompted with a summary of your VM configuration. Confirm that all settings are correct and click Finish. You can always edit VM configuration.
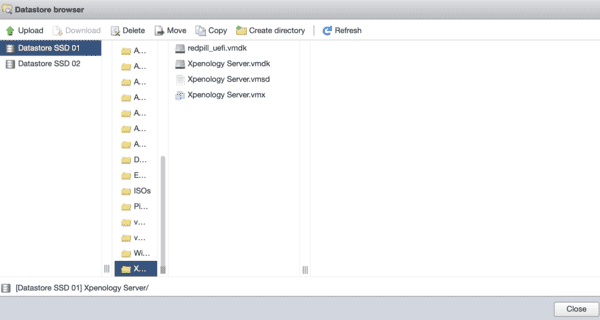
Now we need to head over to the datastore where your VM is and upload 2 of the files you downloaded previously. Open your VM’s folder and click upload, navidate to where you save the downloads, select 1 file at the time to upload: redpill_uefi-flat.vmdk file and then redpill_uefi.vmdk. Note that redpill_uefi.vmdk won’t diskplay in your file list in your datastore once uploaded, no biggy, it’s how ESXi deals with important files. Just click Close once all uploaded
Back to your Xpenology VM, right click it, click Edit settings. On the very top, click Add hard disk, choose Existing hard disk, navigate to your Xpenology VM folder and select redpill_uefi.vmdk disk. Then make sure Controller location is set to SATA controller 0 and SATA (0:0). Click Save once you finished.
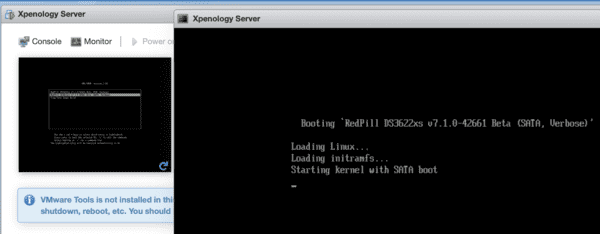
It’s time to power on your Xpenology VM and wait for the magic to happen. It will display some already set options and you don’t have to do anything.
DSM 7.1 installation
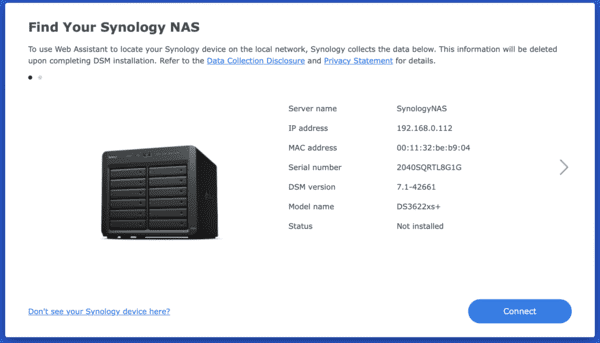
Open your browser and go to Find My Synology. If all went well you should see your new Synology which just its firmware installed.
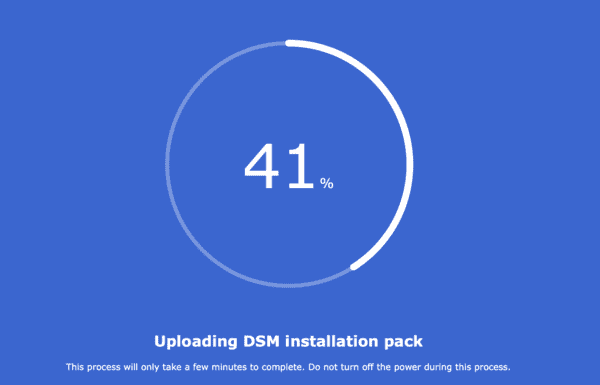
Click Connect, read and accept the EULA (who reads EULA anyway?), Continue in Privacy Statement. Click Install on Welcome page, then browse to the location you downloaded previous files, select DSM_DS3622xs+_42661.pat, click Next. Tick the box that you understand bla bla bla and click Continue. The firmware will start installing and can take up to 10 minutes to complete.
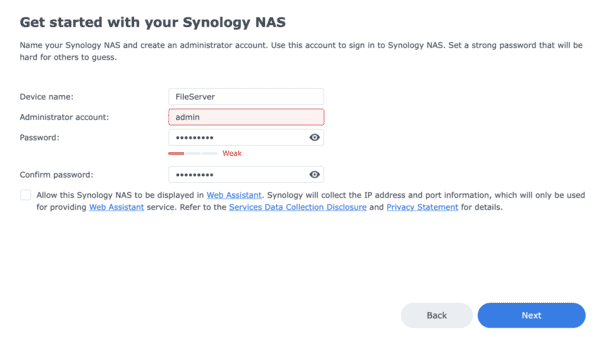
When your Xpenology completes the firmware installation you will then be asked to give it a Name, create an account and password.
Click Next. On select an update option for your Synology NAS choose Notify me when DSM or package updates are available and I will install them manually. This is very important as new updates can break your Xpenology.
Next on Create a Synology Account click Skip, next page Device Analytics don’t tick I agree to allow Synology to collect non-identifiable data to help improve Synology services, just click Submit. That should be it now.
You can now start using your Xpenology NAS and get the most out of it. I’d start by creating a Storage Pool and Volume but this is for another lonnnnng post.
Hope all went well and get in touch if you need any help and I’ll try to assist.
22 Comments
Hi Tedy, thanks for the great post. This helped me out massively when trying to deploy a well-known NAS for my home lab. Now I can keep everything in one place.
Great article, clear and to the point. Better yet it worked.
2 Questions
1.: Do you know the process for getting a free lic for esxi 6.5
2. If I want to upgrade the DSM version it doesn’t seem to take, is there a process I need to follow to update? I downloaded the update from synology and tried to manually apply and it fails and it goes into a recovery mode.
1.) I am using esxi v6.5 I downloaded from the Dell website for a T110 II however where can I get a lic code as I know you can get freeware lic code from vmware?
2.) I tried downloading the DSM updates for this and applying them but it puts it into recovery mode (luckily I took a snapshot). Is there a process for applying updates to the DSM?
Hi. Great instructions, thanks. I add a second network card, but it does not receive an IP address. What could be the reason? We need to add a second mac address, but which one?
Good post, I prefer this above a youtube movie where someone telling me something with indefinable speech. (I’m not native english by language)
Thank You !
Hi, thanks for this post, it’s very useful.
However I’ve tried for days to download the DSM7.1-Xpenology-ESXI.7z file but it keeps dropping out <50% completion.
Tried on different computers, different internet connections (locations 30km apart) and still, I can't get a complete download.
Is there a different way/mirror I can download the file from?
i cant make this work. i get to the step to add the downloaded vmdk and esxi wont allow me to save it. the disk has no connection to anything (its all blank and i am unable to enter anything)

Hi Tedy, thanks for the great post. This helped me out massively when trying to deploy a well-known NAS for my home lab. Now I can keep everything in one place.
me marca error al llegar al 55% de instalacion del DSM que puede ser ???
What if I need more than one VM? I can’t use the MAC 00:11:32:BE:B9:04 twice ….
Great article, clear and to the point. Better yet it worked.
2 Questions
1.: Do you know the process for getting a free lic for esxi 6.5
2. If I want to upgrade the DSM version it doesn’t seem to take, is there a process I need to follow to update? I downloaded the update from synology and tried to manually apply and it fails and it goes into a recovery mode.
Thanks
First off great article, best of all it worked.
2 Questions I have that maybe you can help with.
1.) I am using esxi v6.5 I downloaded from the Dell website for a T110 II however where can I get a lic code as I know you can get freeware lic code from vmware?
2.) I tried downloading the DSM updates for this and applying them but it puts it into recovery mode (luckily I took a snapshot). Is there a process for applying updates to the DSM?
Thanks
Great! Congratulations!
Is it possible to create an SSD Cache?
is it possible to use synology account for DDNS and certificate?
THANK YOU! please if there are updates for the DSM, enter the new ones
+ for the post
Cool + for the post
Hi. Great instructions, thanks. I add a second network card, but it does not receive an IP address. What could be the reason? We need to add a second mac address, but which one?
Hello Tedy, thank you for your advice, is this useful for connection to existing synology account as well ? ( with constant serial number ) ?
+ for the post
_________________
https://bdsports.website
Good post, I prefer this above a youtube movie where someone telling me something with indefinable speech. (I’m not native english by language)
Thank You !
Thnx for the great post.
it Works fine
Hi, thanks for this post, it’s very useful.
However I’ve tried for days to download the DSM7.1-Xpenology-ESXI.7z file but it keeps dropping out <50% completion.
Tried on different computers, different internet connections (locations 30km apart) and still, I can't get a complete download.
Is there a different way/mirror I can download the file from?
Many thanks.
Cool, I’ve been looking for this one for a long time
_________________
অনলাইনে ক্যাসিনো খেলুন
i cant make this work. i get to the step to add the downloaded vmdk and esxi wont allow me to save it. the disk has no connection to anything (its all blank and i am unable to enter anything)
I am unable to download the file as well stops download after reaching 1gb. Please advise
link for data not found can you resend it