
Tedy Vicente
IT Systems Manager
How to setup email template notification on Service Manager
Right out of the box, Service Manager provides you with some very basic email templates that you will have to tweak or create new ones plus create your own workflows for when emails need to be triggered and sent out. Receipient can be for someone who creates an incident or service request, or even when your analysts complete or close a request.
I will try to provide all the steps i used on my Service Manager, along with the email template. They are currently working on my server but i can’t confirm they’ll work on yours, but they will not bring any risk to your systems.
Getting started
We’ll start by opening your Service Manager Console with an account that has Admin rights on it. At this point it will consider that you have added your email server in your Service Manager so it can use it as its SMTP Server. If not yet set, just go to Administration, Notifications, Channels and double click E-Mail Notification Channel. Click Add to add your email server settings. I’ve set mine to servername.mydomain.com in FQDN, port number set to 25 and Authentication method to Anonymous as Service Manager is part ot the same domain as my Exchange server.
Email Template
And now to the main topic, setup email templates and notifications. Go to Left pane and click in Administration, Expand Notifications and go to Templates.
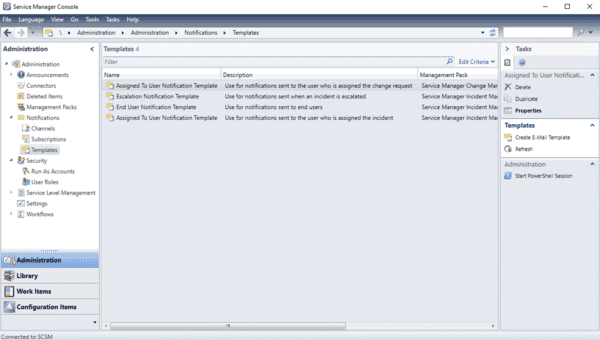
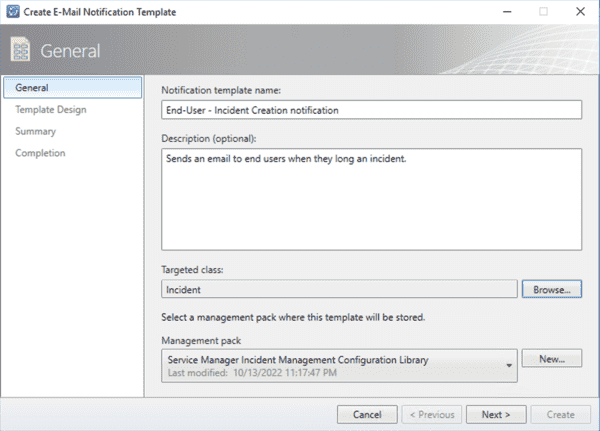
Go to the right pane and click Create E-Mail Template. A new window will pop up, give it a name and description that can help others understand what the template does. Click Browse and select Incident for Targeted class, the Management pack should auto populate to Service Manager Incident Management Configuration Library, so leave it as is or you can create your own by clicking New. Click Next when ready.
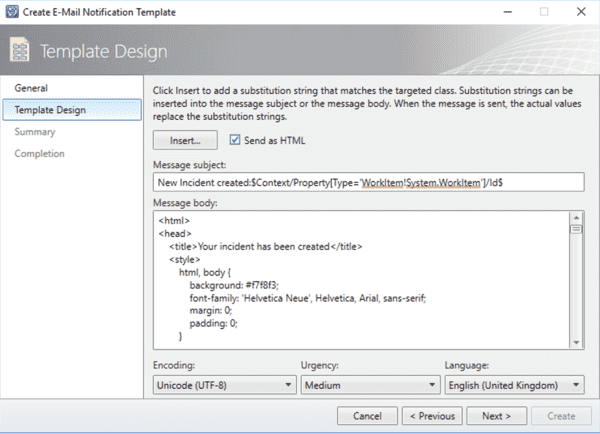
Now you need to setup the Subject and the email body that your end users will see. Start by setting your language, tick Send as HTML and leave the other settings as they are.
My subject will be a simple “New Incident created:[ID]” and the ID of the Incident that will be dinamically popluated by the server. Should look like the below. Note that I added the [] in the begining and end, in case user replies to this email my exchange connector will add the email to the existing incident and not create another one.
New Incident created:[$Context/Property[Type='WorkItem!System.WorkItem']/Id$]
For the body of the subject i want the end-user to have some useful information such as incident title, ID, their first name, how they can follow, update the request or even access it directly from the browser.
Paste the code below into the Message body, change the url in the line 47 to match your Service Manager Portal url, download and host image A and B somewhere reachable by your end-users’ email devices, then change the link in line 59 for A and 56 for B to match your new image urls.
<html>
<head>
<title>Your incident has been created</title>
<style>
html, body {
background: #f7f8f3;
font-family: 'Helvetica Neue', Helvetica, Arial, sans-serif;
margin: 0;
padding: 0;
}
.mainTable {
background: #fff;
border: 1px solid #e9e9e9;
font-size: 14px;
margin: 20px auto;
max-width: 640px;
padding: 0;
width: 100%;
}
strong {
display: inline;
}
</style>
</head>
<body>
<!-- SUBJECT:
Your case have been created: "$Context/Property[Type='CustomSystem_WorkItem_Library!System.WorkItem']/Title$" [$Context/Property[Type='CustomSystem_WorkItem_Library!System.WorkItem']/Id$]
-->
<table class="mainTable">
<tr>
<td align="center">
<p style="color: #009d61; padding: 40px 0 0">INCIDENT CREATED</p>
<p style="padding: 0 0 30px"><strong>$Context/Property[Type='WorkItem!System.WorkItem']/Id$</strong></p>
</td>
</tr>
<tr>
<td style="padding: 0 20px;">
<p>Dear $Context/Path[Relationship='WorkItem!System.WorkItemAffectedUser' SeedRole='Source' TypeConstraint='System!System.Domain.User']/Property[Type='System!System.Domain.User']/FirstName$</p>
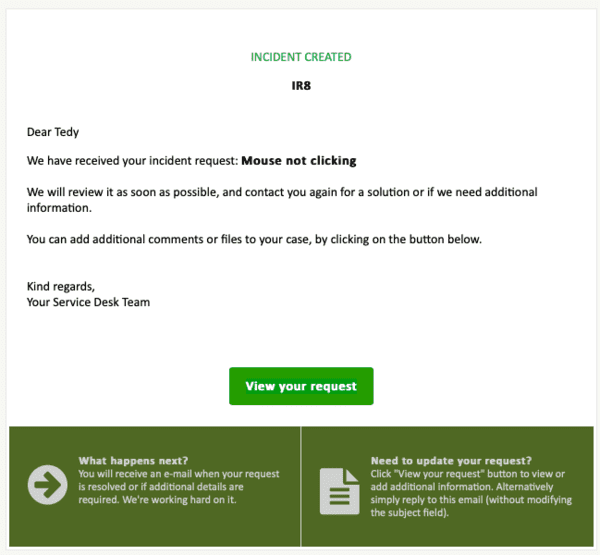
<p>We have received your incident request: <strong>$Context/Property[Type='WorkItem!System.WorkItem']/Title$</strong><br /><br /> We will review it as soon as possible, and contact you again for a solution or if we need additional information.<br /><br /> You can add additional comments or files to your case, by clicking on the button below.<br /><br /><br /> Kind regards,<br /> Your Service Desk Team</p>
</td>
</tr>
<tr>
<td style="padding: 60px 0px 20px; text-align: center;">
<a style="color: #ffffff; text-decoration: none; font-weight: bold; border-radius: 3px; -webkit-border-radius: 3px; -moz-border-radius: 3px; background-color: #009d10; border-top: 12px solid #cb87f2; border-bottom: 12px solid #cb87f2; border-right: 18px solid #cb87f2; border-left: 18px solid #cb87f2; display: inline-block; border-color: #259d00;" href="https://yourservicedeskportal.yourdomain.com/MyRequests/RequestDetails?id=$Context/Property[Type='WorkItem!System.WorkItem']/Id$,IncidentRequest">View your request</a>
</td>
</tr>
<tr>
<td>
<table style="background-color: #4f6823; color: #d0d0d0; text-align: center;" border="0" width="100%" cellspacing="0" cellpadding="0">
<tbody>
<tr>
<td style="text-align: left; color: #d0d0d0; padding: 30px 20px; border-right: 1px #d3d3d3 solid; line-height: 1.2em;" valign="top" width="50%">
<table style="color: #d0d0d0;" border="0" width="100%" cellspacing="0" cellpadding="0">
<tbody>
<tr>
<td width="55"><img loading="lazy" decoding="async" style="margin-top: 10px; border: 0px;" src="https://your_url_where_you_are_hosting_image_A.png" alt="" width="43" height="44" /></td>
<td style="font-size: 12px; "><strong>What happens next?</strong><br /> You will receive an e-mail when your request is resolved or if additional details are required. We're working hard on it.</td>
</tr>
</tbody>
</table>
</td>
<td style="text-align: left; color: #d0d0d0; padding: 30px 20px;" valign="top" width="50%">
<table style="color: #d0d0d0;" border="0" width="100%" cellspacing="0" cellpadding="0">
<tbody>
<tr>
<td width="55"><img loading="lazy" decoding="async" style="margin-top: 10px; border: 0px;" src="https://your_url_where_you_are_hosting_image_B.png" alt="" width="43" height="51" /></td>
<td style="font-size: 12px;"><strong>Need to update your request?</strong><br /> Click "View your request" button to view or add additional information. Alternatively simply reply to this email (without modifying the subject field).</td>
</tr>
</tbody>
</table>
</td>
</tr>
</tbody>
</table>
</td>
</tr>
</table>
<p> </p>
</body>
</html>
For the body of the subject i want the end-user to have some useful information such as incident title, ID, their first name, how they can follow, update the request or even access it directly from the browser. I created my template as HTML, and you can create your own with the information you want your users to receive.
Your template should look like the below and you are now ready to preceed to the next steps. Just click Next and Create in the next Summary page.
Workflow to triger emails
Now that your incidente creation email template is created we can move to how to make Service Manager send the emails to end-user when they create an incident or someone creates them on their behalf.
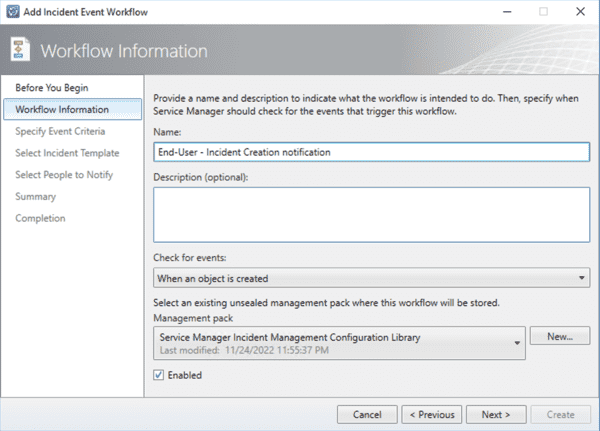
In Administration, expand Workflows, Configuration and double click Incident Event Workflow Configuration. Click Add, give it a name and discription, select When an object is created under Check for events, it should then populate Management pack as Service Manager Incident Management Configuration Library, tick Enable to enable this workflow and click Next.
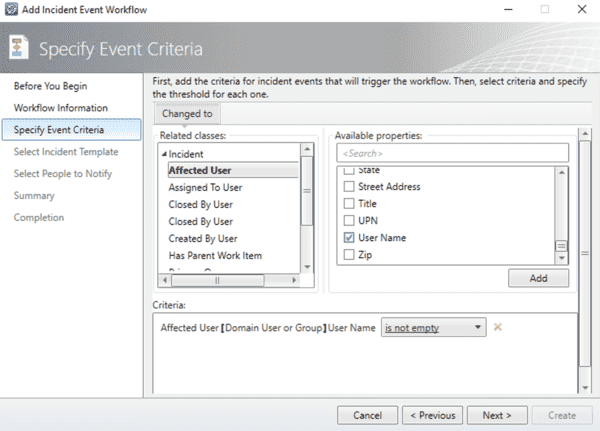
In Specify Event Criteria you will need to set the condition that will be met so Service Manager can populate the dinamic info into the template and send the email. Expand Incident, select Affected User in related classes, tick User Name under Available porperties and click Add. Change the dropdown in the new field to is not empty.
Click Next, leave Incident Template as Do not apply a template, click Next. in Select People to Notify tick Enable notification, leave User as Affected User and set Message template to your template you created earlier then click Add so it shows in the list under.
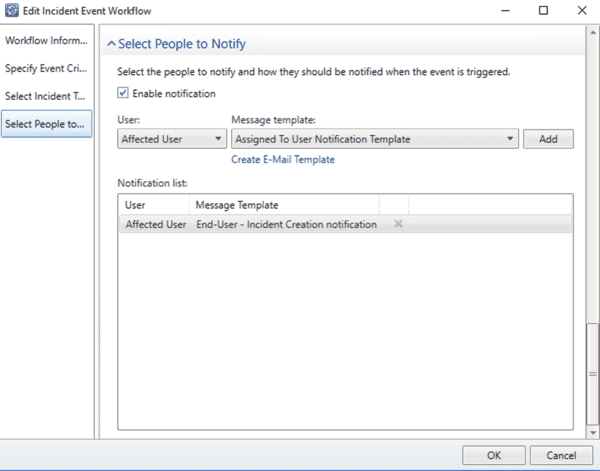
Click OK to close the workflow and you should now have a worflow that sends new incident creation to your endusers. Try creating an incident and see if it works for you. The email recieved should look like the below.
Same basics will work for Service Request too but of course, you will need to change some paremeters, a new template and use a different workflow.
And with this we complete our post on how to setup email template notification on Service Manager. Hope this was of any use to you, and come back for more posts about Service Manager.